
Over the last few weeks, I’ve been using Lightning Experience exclusively in my companies production org and have had several clients asking to trial it in their own orgs. I have to say, I’m actually really enjoying the experience, but getting Lightning Experience up and running is a little more involved than just flipping a switch.
Before getting into some of my observations, let me just say that Lightning Experience isn’t fully baked yet. Please don’t feel like you need to rush into activating this for your org. Salesforce has confessed that most orgs are not going to be able to use Lightning Experience for a while. It’s going to probably take 18 months or more before the Sales Cloud is fully converted. Not only that, but you’ll need to re-train your users, which will be a huge undertaking for most organizations.
Related: Lightning Experience Basics – Trailhead Module
I strongly encourage every Admin to explore Lightning Experience, even if your org has no plans to roll it out. We’ll start to see more and more of the Lightning Experience functionality added to certification exams (I assume) over the course of time, so it’s good to have a grasp on everything LEX!
Also, this is not an extensive list of items that need to be updated. This is simply what I’ve seen as a user of Lightning Experience over the last month. Explore for yourself, and share with others what you find – we’re all learning together and every little bit of knowledge transfer helps!
Navigation Menu
In Salesforce Classic, users see their tabs across the top of the page (which I call the Tab Ribbon). In Lightning Experience, these tabs move to the left side of the page. Turning Lightning Experience on will provide users with a defaulted list of tabs.
Unlike Salesforce Classic, tabs displayed in the navigation menu are not currently driven by the selected App. This means that a Navigation Menu will need to be created and customized for each profile based on what they need access to. Users will still be able to access their apps through the new App Launcher, but these tabs will not automatically become part of the Navigation Menu.
Here’s how to create and customize the Navigation Menu.
Here are are the written instructions for making these changes:
- After activating Lightning Experience, click on the Gear icon in the upper right-hand corner of the page them click Setup Home.
- In the Quick Find box, type Navigation and click Navigation Menus.
- Click New in the upper-right corner of the page to create a new menu.
- Provide a Name and Description then click Next.
- Add the items you want to display in the new navigation menu by dragging and dropping the tabs from Available Items to Navigation Menu Items. Once done, click Next.
- Assign the menu to the appropriate profile(s) and click Save & Finish.
Hopefully, we’ll see the option for users to easily switch between menus in a future release.
Dashboards
The new dashboard components are really beautiful. They use the same component types as Salesforce Wave and make a big difference. But, while Salesforce does a decent job of converting your existing dashboards to the new Lightning Experience design language, they don’t always get it right. More than likely, some dashboard components will need to be updated in order to show meaningful metrics.
IMPORTANT: Modifications to dashboards in Lightning Experience will make the dashboard read-only in Salesforce Classic. It’s recommended that the dashboard is cloned and modified in Lightning Experience to prevent any potential issues in Salesforce Classic.
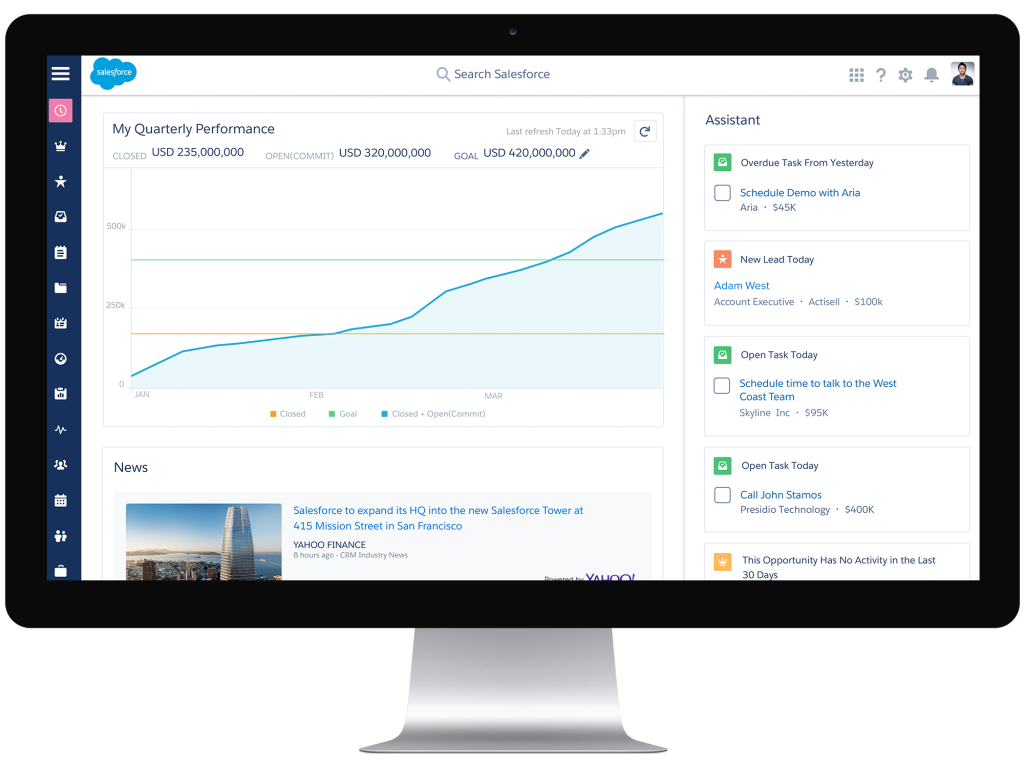
In my companies production org, we activated Lightning Experience and the few dashboards I use didn’t convert well – they really need updating to make the data more relevant and easy to read. Note that Salesforce does not yet support all of the chart types of Salesforce Classic in Lightning Experience so your combo charts in particular will be affected!


In the screenshots above, you’ll see the dashboard in Salesforce Classic, then the same dashboard in Lightning Experience without any modifications. I updated the dashboard components to a more meaningful chart type and arranged some of the components. Don’t forget that in Lightning, you can have up to 9 columns! But, don’t try to fit 9 metrics in one row, it will look awful!
For a full list of reports and dashboard limitations in Lightning Experience as of Spring ’16, click here.
Page Layouts
Page layouts are a big deal because they impact user productivity. Lightning App Builder allows Admins to customize page layouts in Lightning Experience and Salesforce1. This adds the ability to change the structure of the layout with three styles to choose from and indicates the components that should live on the layout.
IMPORTANT: App Builder for Lightning Experience is in open Pilot in Developer Edition Orgs only as of the time this blog post was published. Functionality is planned for production, but no release date has been announced. Because this is a pilot feature, only one page layout can be assigned per object and will be applied for all users regardless of profile.
Creating a custom page layout is relatively straightforward – in fact, it’s much like building a dashboard! Here’s how it works.
Here are the written instructions for making these changes.
- After activating Lightning Experience in your Developer Edition org, click on the Gear icon in the upper right-hand corner of the page then click Setup Home.
- In the Quick Find box, type App Builder and click Lightning App Builder.
- If the Lightning App Builder Pilot hasn’t already been activated in your developer org, check the Enable App Builder for Lightning Experience (Pilot) checkbox.
- Click New in the Lightning Pages list.
- Choose New Record Page.
- Select the template style and click Next.
- Name the page layout, and choose the object then click Finish.
- Build the page layout with the available components including Lightning-ready installed packages and Visualforce pages.
- Save and Activate the layout.
I’m excited for this feature to become available in a future release because it will give organizations the ability to customize Lightning Experience in a way that works the way they do.
Global Actions
Global Actions have been around for a while. These are the actions seen on Salesforce1 and in the Chatter Publisher in Salesforce Classic. I’ve written about how reps were able to create records 54% faster with the use of a Publisher Action over the standard record create functionality – these things are amazing!
Related Post: Get $#!+ Done With Chatter Publisher Actions
But, for existing orgs where Lightning Experience needs to be enabled, Global Actions don’t automatically display for users. This will need to be configured.
There are only a few Global Actions currently supported in Lightning Experience as of Spring ’16: New Event, New Task, Log a Call, and New Note. It’s anticipated that additional standard and custom Global Actions will be available in a future release.
Here’s what the Global Actions button looks like in my old developer org after activating Lightning Experience:

The Actions Publisher is available, but no actions display which is a miss for user productivity! Fixing this is really quite simple. Here’s how to do it.
- After activating Lightning Experience, click on the Gear icon in the upper right-hand corner of the page then click Setup Home.
- In the Quick Find box, type Publisher then click Publisher Layouts from the menu.
- Click Edit next to the Global Layout (or whichever layout your users are assigned).
- In the Publisher Layout, notice that there are two layout types: one for Quick Actions in Salesforce Classic, and the second one for Salesforce1 and Lightning Experience. We’ll be editing the second layout. Select Salesforce1 Actions in the field bank to see available Salesforce1 and Lightning Experience actions.
- Select the following fields and add them to the Salesforce1 and Lightning Experience Actions section: Log a Call, New Event, New Task, New Note and arrange the layout as preferred. Remember, this configuration will also impact Salesforce1.
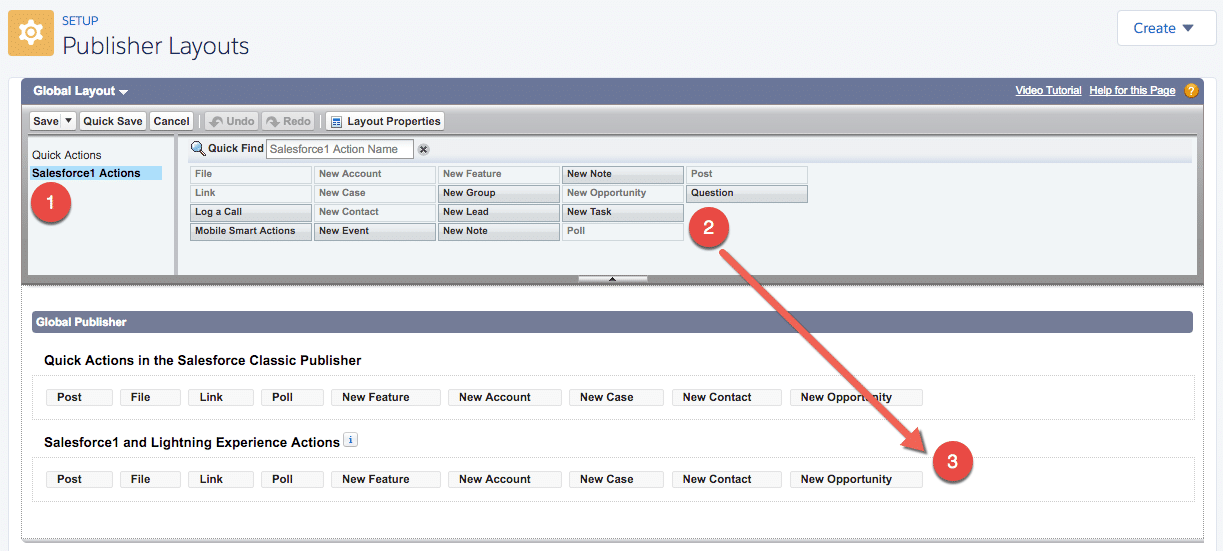
- Click Save to save the new Publisher Layout
Excellent! Now, if we refresh the browser page, we should now see available Global Actions!
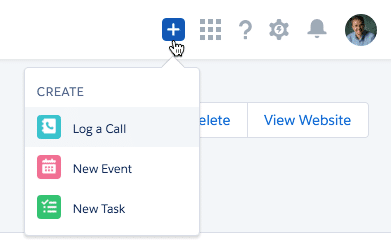
These Global Actions are now available to all users and can be quickly accessed from whatever page they are viewing.
Lightning Experience Considerations
Obviously, Lightning Experience isn’t fully baked and Salesforce is working to update this new UI with functionality and features so that organizations that want to use it can. Keep that in mind as you explore the functionality and evaluate it for your org.
Be sure to keep up with the Salesforce Release Notes so you know what’s available and how limitations and considerations are changing. A full list of considerations is available in the Spring ’16 release notes.
If you’ve discovered something really cool in Lightning Experience, or you are waiting for a certain feature to become available before evaluating it, leave me a comment below or catch me on Twitter (@brentdowney) and let’s chat about it!

Leave a comment